最近はゲーム以外でもUEが使われ始めているので、デバック用やらなんやら別ウィンドウが欲しいときに使えるSlateを使用した別ウィドウを作るやり方をC++で書いてみたいと思います。
C++でSlateを有効にする
ウィンドウを作成するにあたってSlateを有効にします。
(SlateとはUEにおけるUI系全般を担っているものです。UE自体のウィンドウもSlateで作られています。詳しくは各自で調べてみてください)
(各プロジェクト名).Build.csのModuleを定義しているところにSlateを設定します。
PublicDependencyModuleNames.AddRange(new string[] { "Core", "CoreUObject", "Engine", "InputCore", "HeadMountedDisplay", "EnhancedInput", "UMG", "Slate", "SlateCore" });これでC++でSlateを扱うことができるようになりました。
ウィンドウ作成用のソース作成
では実際にウィンドウを作成してみます。
別途作成したウィジットを貼り付けるためにウィンドウの情報を持っていたかったのでActorをベースにしましたが、その辺は各プロジェクトでいい感じに設定してください。
ヘッダ部分
// Fill out your copyright notice in the Description page of Project Settings.

#pragma once

#include "CoreMinimal.h"
#include "GameFramework/Actor.h"
#include "WindowCreateActor.generated.h"

UCLASS()
class WINDOWCREATE_API AWindowCreateActor : public AActor
{
	GENERATED_BODY()

public:
	// Sets default values for this actor's properties
	AWindowCreateActor();

protected:
	// Called when the game starts or when spawned
	virtual void BeginPlay() override;

	virtual void EndPlay(const EEndPlayReason::Type EndPlayReason) override;

public:
	// Called every frame
	virtual void Tick(float DeltaTime) override;

	// ウィンドウ作成
	UFUNCTION(BlueprintCallable, Category = "CreateWindowActor")
	void CreateWindow(const FVector2D& windowSize, const FVector2D& windowPos, const FText& tilte);
	// ウィジット追加
	UFUNCTION(BlueprintCallable, Category = "CreateWindowActor")
	void SetWidget(class UWidget* setWidget);

private:
	// ウィンドウ情報
	TSharedPtr<class SWindow> m_CreateWindow;
	// 別で作成されれたウィジェット配置用
	TSharedPtr<class SOverlay> m_WindowOverlay;
};
ソース部分
// Fill out your copyright notice in the Description page of Project Settings.


#include "WindowCreateActor.h"
#include "Slate.h"
#include "SlateCore.h"
#include "Engine/GameViewportClient.h"
#include "Engine/Engine.h"
#include "Components/Widget.h"

// Sets default values
AWindowCreateActor::AWindowCreateActor()
{
 	// Set this actor to call Tick() every frame.  You can turn this off to improve performance if you don't need it.
	PrimaryActorTick.bCanEverTick = true;

}

// Called when the game starts or when spawned
void AWindowCreateActor::BeginPlay()
{
	Super::BeginPlay();

}

// Called every frame
void AWindowCreateActor::Tick(float DeltaTime)
{
	Super::Tick(DeltaTime);

}


// 終了時の処理
void AWindowCreateActor::EndPlay(const EEndPlayReason::Type EndPlayReason)
{
	Super::EndPlay(EndPlayReason);

	if (m_WindowOverlay) {
		// ここ重要。この処理をしないとベージコレクションされるまでリセットされないアクタのスレートポインタを保持している。というエラーが出る
		m_WindowOverlay.Get()->ClearChildren();
		m_WindowOverlay.Reset();
	}

	if (m_CreateWindow) {
		FSlateApplication::Get().RequestDestroyWindow(m_CreateWindow.ToSharedRef());
	}
}

/*
*	ウィンドウの作成
*	param : windowSize	ウィンドウのサイズ
*	param : windowPos	ウィンドウの位置
*	param : tilte		ウィンドウのタイトル
*/
void AWindowCreateActor::CreateWindow(const FVector2D& windowSize, const FVector2D& windowPos, const FText& tilte)
{
	if (GEngine && GEngine->GameViewport) {
		// ウィンドウ作成
		m_CreateWindow = SNew(SWindow)
			.Title(tilte/*LOCTEXT("CreateWindow", "Title")*/)
			.AutoCenter(EAutoCenter::None)
			.ScreenPosition(windowPos)
			.ClientSize(windowSize)
			.CreateTitleBar(true);

		m_WindowOverlay = SNew(SOverlay);

		//ウィンドウに設定する
		m_CreateWindow->SetContent(m_WindowOverlay.ToSharedRef());

		// 作成したウィンドウを親ウィンドウを設定して即座表示する
		FSlateApplication::Get().AddWindowAsNativeChild(m_CreateWindow.ToSharedRef(), GEngine->GameViewport->GetWindow().ToSharedRef(), true);
		FSlateApplication::Get().SetKeyboardFocus(m_CreateWindow.ToSharedRef());
	}
}

/*
*	ウィジットの設定
*	param : setWidget 追加するウィジット
*/
void AWindowCreateActor::SetWidget(UWidget* setWidget)
{
	if (m_WindowOverlay) {
		// ウィットを設定するためにオーバーレイに指定されたウィジェットを設定する
		auto OVerlaySlot = m_WindowOverlay.Get()->AddSlot();
		OVerlaySlot.AttachWidget(setWidget->TakeWidget());
	}
}
CreateWindowでウィンドウのサイズ、初期表示位置、ウィンドのタイトルを指定してウィンドウを作ります。
SetWidgetで別途作ったウィジットを指定してウィンドウに設定しています。
実際にBPを使ってやってみましょう。
BPから呼び出してウィンドウを表示させる
まずはウィンドウに張り付けるウィジットを適当に作ります。
(ここではウィジットの作り方などの説明は省きます)
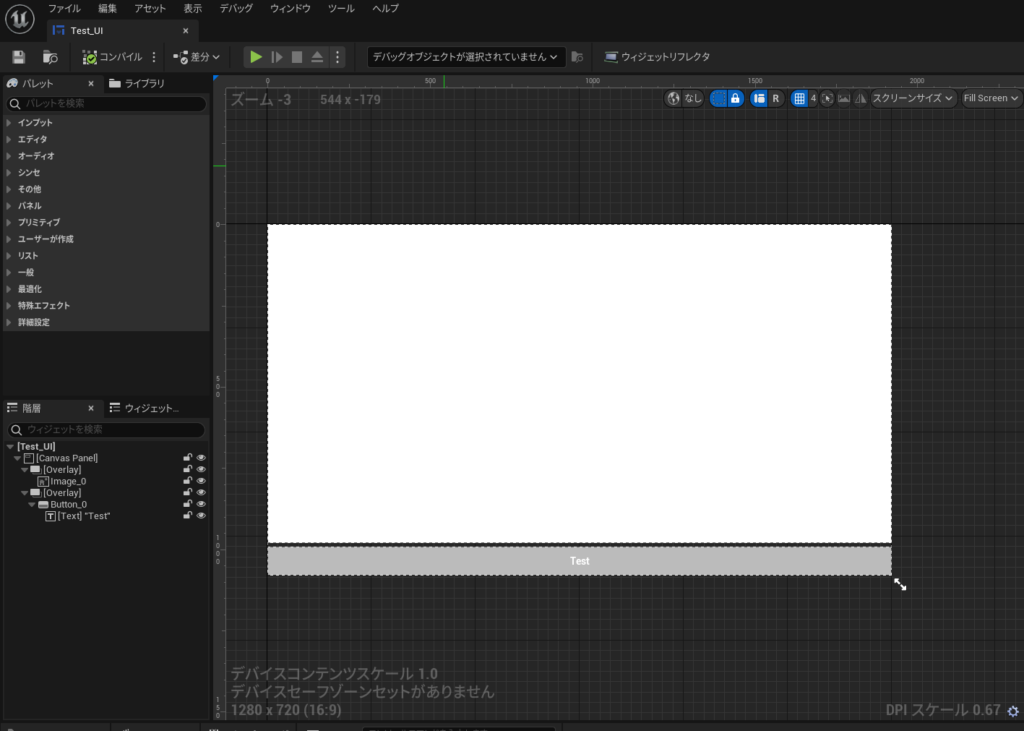
この適当に作ったウィジットをBPから呼び出します。
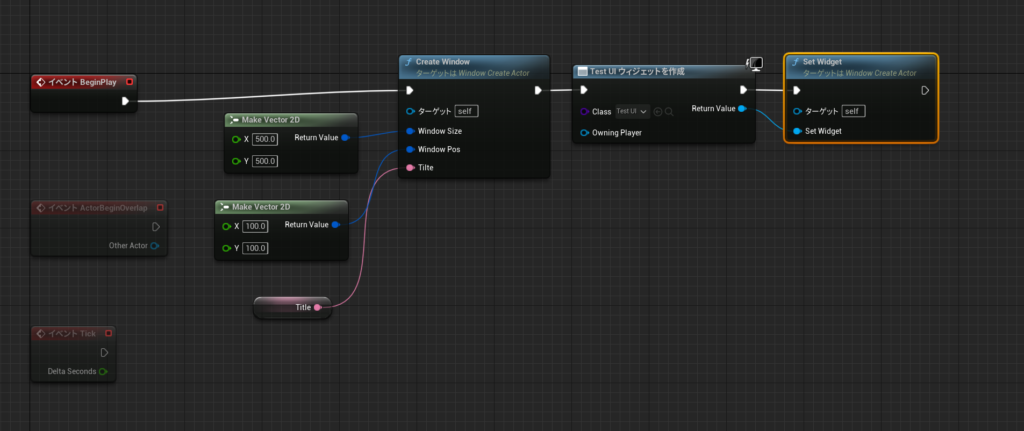
先ほど作ったアクターを親クラスにしてBPを作成。
BeginPlayで先ほど作ったCreateWindowとSetWidgetを呼び出して設定します。
これを実行すると・・・
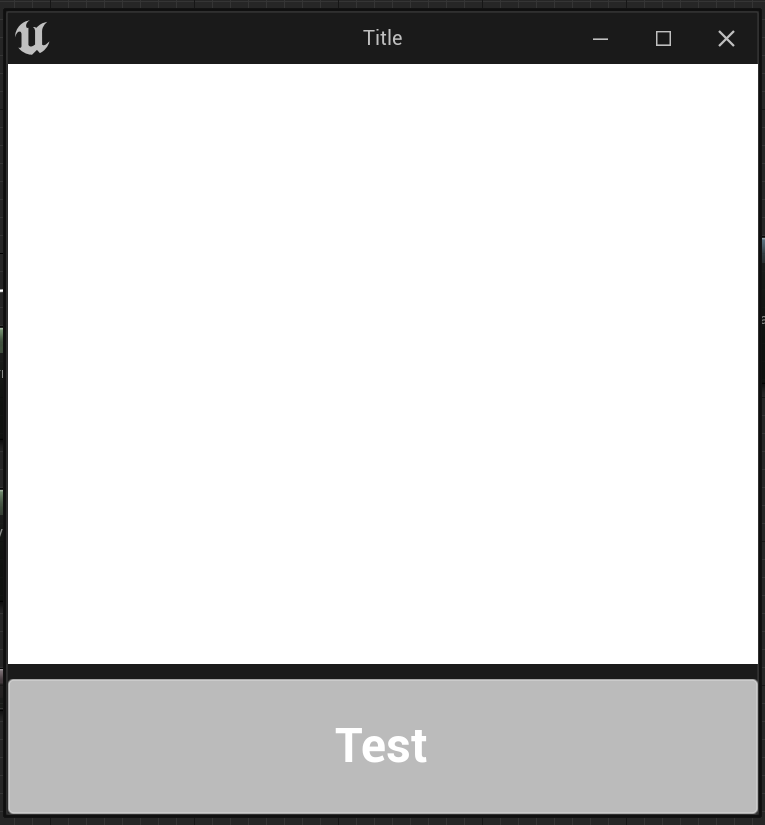
このような別ウィンドウが表れているはずです。
これでとりあえず別ウィンドは作成できたので、必要なウィジェットを作成して貼り付ければ、いろいろできるのではないでしょうか。

コメント